


The best baby food recipes match the skill your baby can manage today: smooth and spoonable, thick and mashable, or soft enough to pick up and squash between two fingers. Most babies begin solids at about 6 months when they show the full set of readiness signs, not simply because a date arrived on the calendar. Human milk or infant formula remains the main drink and central nutrition through the first year; these recipes are complementary foods, not a replacement.
In this guide
- Start with readiness, not the recipe card
- Choose the rung your baby can safely manage
- Set up the kitchen once, then make the recipes
- A small-batch workflow that does not take over the kitchen
- What a safe finished texture should do
- Four baby puree recipes with a real texture check
- Four mashable meals for the next texture skill
I have organized these homemade baby food recipes by observable feeding skill because age labels can give a false sense of precision. One 7-month-old may be ready to explore soft finger foods while another needs more time with thick mash. That variation can be completely ordinary. The non-negotiable part is that every bite passes the final texture check and every meal happens with calm, upright supervision.
Start with readiness, not the recipe card
According to the CDC’s current complementary-feeding guidance, solids generally begin at about 6 months and should not begin before 4 months. Look for the skills working together:
- steady head and neck control;
- sitting upright with appropriate support;
- opening the mouth when food is offered;
- swallowing food instead of consistently pushing it back out; and
- moving food toward the back of the mouth well enough to swallow.
A jar marked “Stage 1” cannot confirm those skills. Neither can a baby’s interest in your fork. If you are wondering whether jar food is appropriate at 3 months, this guide on why three months is too early for jar food handles that specific question in more detail.
Once solids begin, keep nursing or offering correctly prepared infant formula as usual. Start with small tastes and build variety gradually. There is no serving size your baby must finish. A recipe yielding six tablespoons means “a few clean portions are available,” not “six tablespoons belong in one small person.”
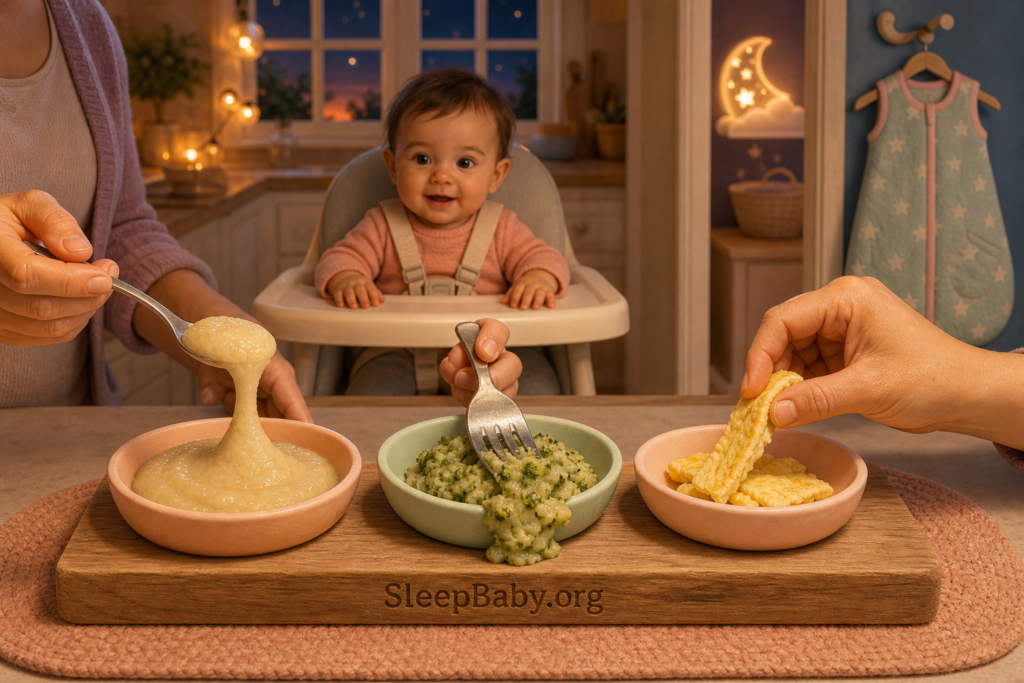
A three-rung texture progression
Choose the rung your baby can safely manage
Progress is not a race, but perfectly smooth puree is not meant to become a permanent parking spot either. Move toward thicker, lumpier, and graspable food as your baby shows the skills to manage it.
1. Smooth and spoonable
For a newly ready eater who manages a smooth spoonful. The food should slide slowly from the spoon with no dry clumps, skins, fibers, or bones.
2. Thick mash and soft lumps
For a baby who moves food around the mouth and manages texture. Every lump must flatten easily under a fork.
3. Soft finger foods
For a baby who reaches, grasps, brings food to the mouth, and eats upright. Every piece must squash between thumb and forefinger.
Set up the kitchen once, then make the recipes
Baby food does not need a laboratory, but it does need the same clean, separate, cook, and chill habits that protect any young child. Babies and toddlers are more vulnerable to foodborne illness, so the little details matter: washed hands, a clean cutting board, pasteurized dairy, fully cooked animal foods, and a blender gasket that is not quietly keeping yesterday’s puree as a souvenir.
Clean
Wash hands, produce, tools, blender parts, trays, and work surfaces. Use hot soapy water on equipment after food contact.
Separate
Keep raw meat, poultry, fish, and eggs away from ready-to-eat produce and cooked food. Use clean utensils after cooking.
Cook
Use a food thermometer for animal foods. Color, steam, or “it has been in there a while” is not a temperature reading.
Chill
Cool promptly in small portions. Refrigerate or freeze within two hours, label the date, and keep the serving spoon out of the stored batch.
| Food | Minimum temperature | Final check |
|---|---|---|
| Poultry | 165°F | No bones, skin, gristle, or firm fibers |
| Ground meat | 160°F | Moist, fully cooked, and broken into safe texture |
| Egg dishes | 160°F | Firm, never runny or rubbery |
| Fish | 145°F | Opaque and flaking, then checked carefully for bones |
Temperature guidance follows the CDC’s safer-food guidance for children under 5. Always measure in the thickest part before blending or shaping.
A small-batch workflow that does not take over the kitchen
The easiest homemade system is not a Sunday spreadsheet with 42 color-coded cubes. It is one safe base, one texture decision, and a few clean portions. This five-step rhythm keeps the recipe cards flexible while protecting the safety details that should not flex.
-
1. Decide whether today is for learning or combining
If an ingredient is new, offer it in a simple safe form so a reaction or texture problem is easier to identify. If all ingredients are familiar, a combination recipe can broaden flavor and nutrients. Do not hide a new allergen inside a four-ingredient meal and then wonder which ingredient mattered.
-
2. Prepare the baby’s portion before family seasoning
Cook a shared ingredient without added salt or sugar, remove the baby’s clean portion, then season the family food separately. This works well with roasted squash, steamed broccoli, cooked lentils, potato, quinoa, poultry, and fish. It does not make every family dish baby-safe: watch for honey, unpasteurized ingredients, undercooked animal food, high sodium, bones, and choking shapes.
-
3. Cook to a measurable finish
Use the thermometer for animal foods and the fork for produce and grains. A vegetable is ready for these recipes when its thickest piece collapses without resistance. Beans need to mash completely. Rice, quinoa, and oats need to be soft throughout, not tender outside with a firm center.
-
4. Make the texture after cooking
Blend a newly ready eater’s portion smooth, fork-mash another portion for a baby managing lumps, or shape an already-soft mixture for a skilled finger-food eater. The same ingredients do not automatically make all three versions safe. A baked finger can develop a hard shell; a potato puree can become sticky; a mash can hide a whole bean. Test the final form, not the ingredient list.
-
5. Portion, label, and close the loop
Move food into shallow clean containers so it cools promptly. Label the recipe and date before the lid disappears into the drawer. Refrigerate only what fits the 24- or 48-hour lane and freeze the rest immediately. Put one serving in a clean bowl; the batch never meets the feeding spoon.
This workflow also makes substitutions safer. You can swap a cooked-soft vegetable for another cooked-soft vegetable, or one fully cooked lower-mercury fish for another, while keeping the same reader job. You cannot swap in a dry flour, whole nut, sticky nut butter, raw vegetable, or tough meat and assume the old directions still apply. When the substitute changes moisture, allergen status, cooking temperature, or chewing demand, it is a new recipe decision.
Test the food after every change
What a safe finished texture should do
Puree: slow, smooth movement
Drag a spoon through the bowl. The puree should come back together smoothly and slide from the spoon slowly. Blend out skins, fibers, dry cereal pockets, sticky potato clumps, and every fish or meat fragment. Thin a clean serving gradually rather than flooding the full batch.
Mash: every lump gives way
Press the largest lump with the back of a fork. It should flatten without force. Check the bowl from the bottom up for whole beans, firm grains, berry rounds, broccoli stems, rubbery egg, or dry flakes that escaped the first pass.
Finger food: graspable, then collapsible
The piece may hold long enough to reach the mouth, but it must squash between thumb and forefinger. Test the center and the edge. A tender middle does not rescue a crisp crust, and chopping a hard food smaller can create a more dangerous round piece.
Texture can change after chilling, freezing, or reheating. Repeat the test each time. If your baby repeatedly coughs, chokes, sounds wet or congested during meals, or cannot progress beyond one texture, pause the experiment and ask the child’s clinician about a feeding evaluation.
Stage 1: smooth and spoonable
Four baby puree recipes with a real texture check
These baby puree recipes are for a baby who is developmentally ready and safely manages a smooth spoonful. Start with one ingredient at a time when it is new. The combination cards below are for ingredients already tolerated unless the card says otherwise.
1. Pear and iron-fortified oat puree
Texture stage: Smooth and spoonable. Yield: about 1/2 cup pear puree, divided into small portions.
Ingredients: 1 small ripe pear, peeled, cored, and diced; 2 to 4 tablespoons water; iron-fortified oat infant cereal prepared according to its label for the serving.
- Steam or simmer the pear until every piece collapses under a fork, about 8 to 12 minutes depending on ripeness and size.
- Blend the pear with enough water to make a smooth, slow-dropping puree. Cool.
- At serving time, stir a spoonful of pear into cereal prepared exactly as the package directs. Do not add dry cereal to the stored batch.
Texture and allergen check: No dry or gluey cereal pockets. Check the cereal label for wheat and cross-contact information. Use the combination only after pear and that cereal have each been tolerated.
Store: Refrigerate plain pear puree up to 48 hours or freeze labeled portions up to one month. Once mixed with milk or formula, serve promptly and discard the served remainder.
Safe variation: Replace pear with peeled apple cooked until completely soft; keep the same smooth texture gate.
2. Sweet potato and red lentil puree
Texture stage: Smooth and spoonable. Yield: about 3/4 cup, divided into small portions.
Ingredients: 1/2 cup peeled sweet potato in small cubes; 2 tablespoons dry red lentils, rinsed and checked for debris; 1 cup water, plus more for blending.
- Simmer the sweet potato, lentils, and water until both are fully tender and the lentils have broken down, about 18 to 22 minutes. Add water if the pan gets dry.
- Blend while warm, adding clean water a tablespoon at a time. Cool the serving before offering it.
Texture and allergen check: Silky and moist, with no firm sweet-potato centers or dry lentil skins. Lentil is a legume and should still be introduced as a new food deliberately.
Store: Refrigerate up to 48 hours or freeze individual labeled portions up to one month. Discard any portion touched by the feeding spoon.
Safe variation: Use peeled butternut squash instead of sweet potato and cook to the same fork-collapse test.
3. Chicken and butternut squash puree
Texture stage: Smooth and spoonable. Yield: about 2/3 cup, divided into small portions.
Ingredients: 2 ounces boneless, skinless chicken; 1 cup peeled butternut squash cubes; about 1/2 cup water for steaming and blending.
- Cook the chicken separately until its thickest part reaches 165°F. Steam or simmer the squash until it collapses under a fork.
- Inspect the chicken for bone, skin, gristle, and firm connective tissue. Blend chicken and squash with enough water to become completely smooth and moist.
Texture and allergen check: No visible meat fibers, firm squash, skin, gristle, or bones. The base recipe has none of the U.S. major nine allergens, but every added ingredient needs its own check.
Store: Because it contains meat, refrigerate no more than 24 hours or freeze labeled portions immediately for up to one month.
Safe variation: Replace squash with peeled carrot cooked until it crushes without resistance.
4. Salmon, potato, and pea puree
Texture stage: Smooth and spoonable. Yield: about 3/4 cup, divided into small portions.
Ingredients: 2 ounces lower-mercury salmon; 1/2 cup peeled potato cubes; 1/4 cup peas; water for cooking and blending.
- Cook salmon to 145°F until opaque and flaking. Cook potato and peas until both crush easily.
- Flake the fish onto a clean plate and check it carefully twice for bones. Blend everything with water until uniformly smooth and moist.
Texture and allergen check: Fish is a major allergen. Use this combination only after each ingredient has been tolerated, and confirm zero bones, pea skins, dry flakes, or sticky potato clumps.
Store: Refrigerate no more than 24 hours or freeze labeled portions immediately for up to one month.
Safe variation: Use another FDA “Best Choice” fish suitable for your family, fully cooked and meticulously deboned.
Stage 2: thick mash and soft lumps
Four mashable meals for the next texture skill
These recipes are intentionally not smooth. They are for a baby who already manages thicker food and moves soft lumps around the mouth. Mash with a fork and inspect every piece. If the finished food contains a surprise hard stem, whole bean, or round berry, it is not ready for the high-chair tray.
5. Egg, avocado, and potato mash
Texture stage: Thick mash with soft crumbs. Yield: about 1/2 cup.
Ingredients: 1 fully cooked egg; 1/4 ripe avocado; 1/4 cup potato cooked until collapsing-soft; 1 to 2 teaspoons water if needed.
- Cook the egg until the dish reaches 160°F and both yolk and white are firm. Cook the potato until it crushes without resistance.
- Mash all ingredients together. Add a little water only if the mixture is dry.
Texture and allergen check: Egg is a major allergen. Use this combination only after an appropriate egg introduction unless your clinician gave a different plan. There should be no rubbery egg chunks or sticky potato balls.
Store: This tastes and textures best served now. If needed, refrigerate a clean untouched portion no more than 24 hours; do not freeze avocado mash.
Safe variation: Replace avocado with cooked mashed zucchini for a lighter, still-moist texture.
6. Plain yogurt, berry, and oat mash
Texture stage: Thick mash. Yield: about 1/3 cup.
Ingredients: 1/4 cup pasteurized full-fat plain unsweetened yogurt; 2 tablespoons cooked soft oats; 2 tablespoons berries, cooked until soft and crushed completely.
- Cook oats until very soft. Warm berries in a small pan until they burst easily, then crush and cool them.
- Fold oats and berries into cold yogurt. Inspect for whole round fruit or tough skins.
Texture and allergen check: Milk is a major allergen; oats may carry wheat cross-contact, so read the label. Use only after the ingredients have been tolerated. The mash should mound softly, with every berry flattened.
Store: Make a small batch and serve now. Refrigerate an untouched portion up to 48 hours; never save food from the serving bowl.
Safe variation: Use peeled cooked peach instead of berries, mashed to the same soft consistency.
7. Tofu, broccoli, and rice mash
Texture stage: Thick mash with very soft lumps. Yield: about 2/3 cup.
Ingredients: 1/4 cup soft tofu; 1/4 cup broccoli florets and peeled tender stem; 1/4 cup cooked very soft rice; 1 to 3 tablespoons water.
- Steam broccoli until both floret and stem collapse under a fork. Cook rice with enough water that no firm grain remains.
- Mash tofu, broccoli, and rice. Add water until moist rather than pasty.
Texture and allergen check: Soy is a major allergen. Use the combination only after each ingredient is tolerated. Every stem and rice clump must flatten with gentle fork pressure.
Store: Refrigerate up to 48 hours or freeze labeled portions up to one month. Stir after reheating and cool before serving.
Safe variation: Swap broccoli for peeled zucchini cooked until fully soft.
8. White bean, carrot, and quinoa mash
Texture stage: Thick mash with soft texture. Yield: about 2/3 cup.
Ingredients: 1/4 cup no-salt-added cooked white beans, rinsed; 1/4 cup peeled carrot coins; 2 tablespoons cooked quinoa; water as needed.
- Cook carrot until it crushes without resistance. Cook quinoa until fully soft.
- Mash beans completely first, then add carrot and quinoa. Moisten so the mixture is cohesive and not crumbly.
Texture and allergen check: Beans are legumes and should be introduced deliberately. No whole bean, firm carrot center, or loose hard grain should remain.
Store: Refrigerate up to 48 hours or freeze labeled portions up to one month.
Safe variation: Replace quinoa with very soft cooked barley only after wheat has been introduced and tolerated.
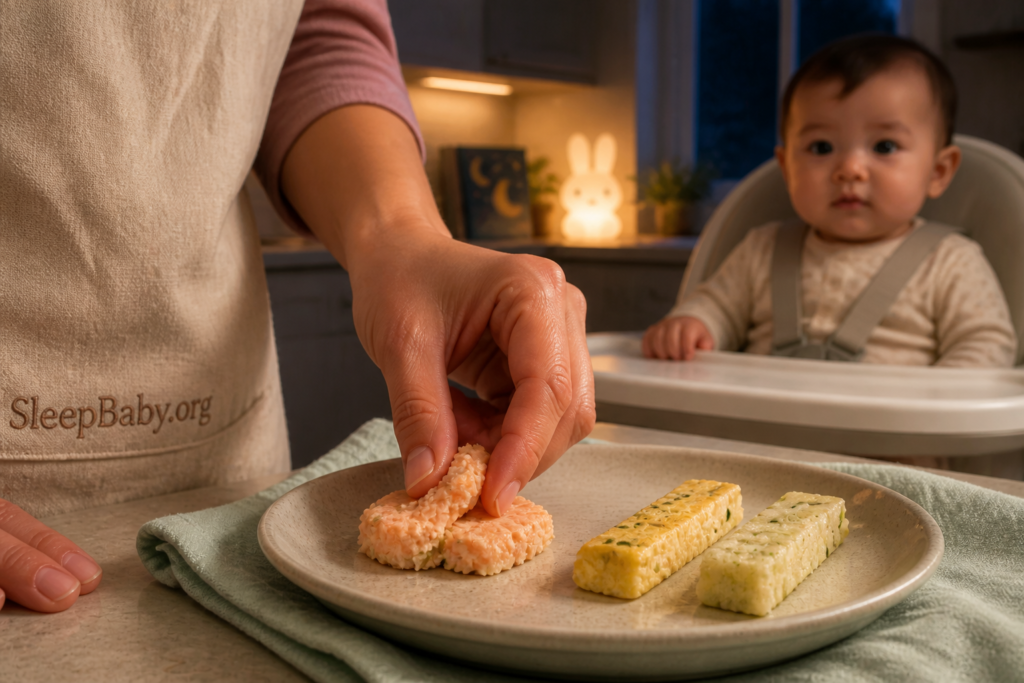
Stage 3: soft finger foods
Four graspable foods that still pass the squash test
Finger food is a texture, not a dare. Offer it only when your baby can sit upright appropriately, reach and grasp, bring food to the mouth, and manage soft pieces. Shape food for the grasp your baby uses. Long soft strips can be easier for an earlier palmar grasp; smaller soft pieces may suit a developed pincer grasp. Either way, the piece must collapse under gentle pressure before it reaches the tray.
9. Soft vegetable omelet strips
Texture stage: Soft finger food. Yield: 4 to 6 soft strips, depending on pan size.
Ingredients: 1 egg; 2 tablespoons finely chopped zucchini or spinach cooked until very soft; 1 tablespoon water; a thin wipe of cooking oil if needed.
- Whisk egg and water, fold in the soft vegetables, and cook in a small covered skillet over low heat until the center reaches 160°F. Do not brown it into a crisp edge.
- Cool, then cut into strips suited to your baby’s grasp.
Texture and allergen check: Egg is a major allergen; offer this recipe only after egg has been introduced appropriately. A strip should bend and squash between thumb and forefinger, with no rubbery center or hard edge.
Store: Refrigerate an untouched portion no more than 24 hours. Reheat until steaming, then cool fully before serving.
Safe variation: Use very soft finely chopped broccoli tops instead of zucchini; recheck every piece.
10. Sweet potato lentil patties
Texture stage: Soft finger food. Yield: about 6 small flat patties.
Ingredients: 1/2 cup cooked mashed sweet potato; 1/4 cup red lentils cooked until broken down; 2 tablespoons iron-fortified oat infant cereal if already tolerated.
- Mix the already-cooked ingredients. Form thin patties rather than dense balls.
- Bake on parchment at 350°F just until set, about 10 to 12 minutes, turning once. Keep them pale and tender, not crisp. Cool completely.
Texture and allergen check: Read the cereal label for wheat and cross-contact. Use only after each ingredient has been tolerated. The patty must crumble and flatten with gentle finger pressure, with no crisp crust.
Store: Refrigerate up to 48 hours or freeze labeled patties up to one month. Thaw in the refrigerator and recheck softness after warming and cooling.
Safe variation: Replace sweet potato with butternut squash; if the mixture becomes wetter, add only enough tolerated cereal to keep a soft shape.
11. Boneless salmon and potato cakes
Texture stage: Soft finger food. Yield: about 5 small flat cakes.
Ingredients: 2 ounces salmon; 1/2 cup potato cooked until very soft; 1 tablespoon prepared iron-fortified oat cereal if needed to bind and already tolerated.
- Cook salmon to 145°F. Flake it finely on a clean plate and check twice for bones.
- Mash with potato, form thin cakes, and warm in a covered skillet just until they hold. Avoid a browned crust. Cool fully.
Texture and allergen check: Fish is a major allergen. The cereal may introduce wheat. Use only after tolerated. Each cake must flake and squash easily, with no bone, dry compact center, or hard edge.
Store: Refrigerate no more than 24 hours or freeze labeled cakes up to one month.
Safe variation: Use cooked lower-mercury pollock, fully deboned, and keep the same temperature and texture checks.
12. Tofu zucchini fingers
Texture stage: Soft finger food. Yield: about 6 tender fingers.
Ingredients: 1/2 cup soft or medium-firm tofu, drained; 1/4 cup finely grated zucchini, cooked and gently squeezed; 2 tablespoons iron-fortified oat infant cereal if already tolerated.
- Mash tofu, cooked zucchini, and cereal. Shape into short thick fingers.
- Bake on parchment at 350°F until the pieces hold together, about 10 to 12 minutes. Do not create a crisp shell. Cool completely.
Texture and allergen check: Soy is a major allergen; cereal labels may list wheat. Use only after the ingredients are tolerated. The finger should hold for grasping but collapse under gentle pressure, with no rubbery exterior.
Store: Refrigerate up to 48 hours or freeze labeled portions up to one month.
Safe variation: Use cooked finely grated carrot in place of zucchini, confirming that no firm shreds remain.
One new allergen, one clear decision
Introduce allergens in a form that is safe to swallow
Current pediatric guidance does not recommend delaying developmentally safe allergenic foods solely to prevent allergy. The practical rule is to introduce one new allergen at a time, in a small amount, when your baby is well and you can observe them. Once tolerated, keep it in the family’s regular rotation rather than treating the first bite as a one-and-done ceremony.
- Ordinary introduction: Baby is ready for solids, well today, and has no high-risk history. Offer one allergen in a safe texture with familiar foods.
- Already tolerated: A mixed recipe may be used when its ingredients have each been tolerated. Continue offering tolerated allergens routinely.
- Clinician-guided pathway: Severe eczema, egg allergy, a previous immediate food reaction, or an existing allergy diagnosis calls for the child’s clinician’s plan before home introduction.
- Possible reaction: Stop the food and contact the child’s clinician. Hives, facial swelling, repeated vomiting, coughing, or wheezing deserve prompt medical guidance.
- Emergency signs: Breathing difficulty or swelling of the throat or tongue is an emergency. Call local emergency services and follow the child’s prescribed emergency plan.
The American Academy of Pediatrics and NIAID peanut guidance are especially important for the high-risk branch. This article does not replace a clinician’s testing, dose, or supervision plan.
Thinned smooth peanut
For: a baby ready for solids who is not in a clinician-directed high-risk pathway.
Method: Whisk 1 teaspoon smooth peanut butter with 2 to 3 teaspoons warm water until loose and uniform, then blend into a familiar puree or prepared cereal. Add more liquid if any sticky clump remains.
Never: a whole peanut, chopped nut, or thick spoonful of nut butter.
Thinned smooth sesame
For: one new allergen offered with a familiar base.
Method: Whisk 1 teaspoon smooth tahini into 2 to 3 tablespoons familiar puree until loose, moist, and completely uniform.
Never: a sticky lump of tahini or whole loose seeds in an early spoon texture.
Use a conservative storage clock
Homemade baby food is not the place for optimistic refrigerator archaeology. The house rule below follows the current USDA WIC infant-feeding job aid and stays consistent across all 12 recipes.
Serve now
Discard food left out more than two hours and every leftover that touched the feeding spoon.
24 hours
Refrigerator limit for home-prepared foods containing meat, poultry, fish, or egg.
48 hours
Refrigerator limit for other clean, home-prepared baby foods.
1 month
Freezer limit for portions frozen promptly and labeled with the recipe and date.
Thaw in the refrigerator or under cold running water, not on the counter. Do not refreeze thawed homemade infant food. Reheat only the portion you need until steaming, stir well to remove hot spots, and let it cool before serving. If you cannot remember when it was made, the freezer cube has already answered the question for you: let it go.
For full handling details, see the USDA WIC infant food-safety job aid and the FDA’s baby food handling guidance.
Gagging and choking are not the same
Gagging can be noisy
Gagging is a protective response that can happen while a baby learns texture. A gagging baby may cough, make noise, redden, or push food forward. Stay calm and watch closely; do not sweep a finger blindly into the mouth.
Choking can be quiet
Choking can block breathing and may be silent. If your baby cannot breathe, cry, or cough effectively, call local emergency services and begin age-appropriate choking first aid if you are trained.
An article is not a substitute for hands-on infant CPR and choking training. Learn current skills before you need them. Prevention still does most of the daily work: upright seating with restraints used correctly, an adult within reach, no eating in a car or stroller, no rushed or distracting meal, and no hard, round, sticky, or tough pieces. The CDC choking-hazard guide has a practical list of foods to change or avoid.

Build variety without turning meals into a nutrition spreadsheet
Produce-only purees are colorful, but they are not the whole complementary-feeding picture. Iron and zinc matter during infancy, so rotate in iron-fortified cereals, beans, lentils, poultry, meat, egg, tofu, and lower-mercury fish in forms your baby can manage. The CDC’s vitamin and mineral guidance explains why those nutrients deserve deliberate attention.
Vary grains too. Rice cereal does not need to be first or only; oat, barley, wheat, and multigrain options can broaden the pattern when their ingredients are appropriate and tolerated. Rotate produce colors and protein sources rather than making one “perfect” recipe every day. Variety is a long game, not a performance review of Tuesday lunch.
Keep the avoid list plain: no honey before 12 months; no added sugar or salt; no unpasteurized food or drink; no raw or undercooked animal foods; no whole nuts or thick nut-butter spoonfuls; and no high-mercury fish. Juice and cow’s milk should not replace human milk or infant formula as drinks before 12 months. For fish, choose lower-mercury options, cook fully, and remove every bone. The CDC avoid-or-limit list is worth bookmarking.
Practical questions about homemade baby food recipes
Can I thin a whole batch with breast milk or formula?
It is safer and more flexible to keep the stored batch plain. Put one serving in a clean bowl, then thin that serving with breast milk or correctly prepared formula. Discard what remains in the serving bowl. This also lets you adjust texture without repeatedly warming the whole batch.
What if a frozen puree becomes watery or grainy?
Thaw it safely, heat until steaming if reheating, stir thoroughly, and cool. Separation can be normal, but the final texture still has to pass the same check. If it stays stringy, sticky, dry, or uneven after stirring, do not serve it in that form. You can blend a clean portion again or choose another recipe.
Can I substitute ingredients?
Yes, when the substitute has already been tolerated and you preserve the safety job of the original ingredient. A soft cooked vegetable can often replace another soft cooked vegetable. A new allergen should not be hidden inside a mixed recipe. Changing potato to a dry flour or soft salmon to a tough meat strip changes the texture and requires a new method, not a casual swap.
How often should I repeat a tolerated allergen?
Pediatric guidance supports keeping tolerated allergens in the regular diet, but the exact schedule can depend on the food, the child, and the clinician’s plan. Build them into ordinary meals in safe forms rather than waiting months between exposures. If your baby has eczema, a known allergy, or a prior reaction, use individualized medical guidance.
Do I need a special baby-food maker?
No. A saucepan, steamer basket, fork, clean cutting board, food thermometer, and ordinary blender or food processor can do the work. A small mesh strainer can help remove skins or fibers for an early puree. The useful tool is the one you can fully clean, including the lid seam and gasket.
Will cereal or a heavier evening meal help my baby sleep longer?
Do not use solids as a sleep treatment or put cereal in a bottle. Readiness, choking safety, and nutrition determine when and how food is offered. A calmer prep routine may make the household evening feel less frantic, but no puree or patty promises a longer stretch of sleep.
When should I ask for individualized feeding help?
Contact your baby’s clinician if readiness is unclear, growth or intake worries you, your baby repeatedly coughs or chokes with meals, texture progression feels stuck, or you suspect an allergic reaction. A pediatric feeding or dietitian referral can address the child’s specific skills and nutrition. Breathing difficulty or throat or tongue swelling requires emergency help, not an office-message wait.
Sources
- CDC: When, What, and How to Introduce Solid Foods
- CDC: Choking Hazards
- CDC: Foods and Drinks to Avoid or Limit
- CDC: Tips for Mealtime Routines
- CDC: Vitamins and Minerals
- CDC: Safer Food Choices for Children Under 5
- FDA: Food Safety Once Baby Arrives
- USDA WIC: Infant Feeding Food Safety Job Aid
- FDA: Healthy Food Choices for Babies 6-12 Months
- American Academy of Pediatrics: Introducing Common Allergens
- NIAID: Addendum Peanut Allergy Prevention Guidelines
- NHS: Feeding From Around 6 Months
- NHS: Food Allergies in Babies and Young Children
- FDA/EPA: Advice About Eating Fish
When the high chair is clean and the kitchen can exhale
Let feeding stay feeding – and give sleep its own gentle plan
A labeled freezer tray and a short list of safe recipes can make evenings less frantic. They cannot make solids fix sleep. If bedtime is still the hard part after dinner is done, SleepBaby can help you build a responsive plan around your baby’s sleep needs without turning the last spoonful into a promise it cannot keep.
Try this tonight
Keep the safety line clear.
Use this plan only for non-urgent routine observations. Breathing, color, responsiveness, feeding, growth, illness, or a gut-level concern belongs with a qualified clinician.
What to notice
Record the exact concern, when it appears, and what changes before and after it.
One change
Follow the clearest age-appropriate safety action in this guide. For a medical question, make the one change a call to your child’s clinician.
Do not change
Do not improvise around safe-sleep guidance or delay care in order to run a sleep experiment.
Reassess
Reassess immediately if the concern changes or worsens. Do not wait three nights when symptoms or safety are involved.
3-night tracker
Look for a pattern, not a perfect night.
Use this tracker only for a non-urgent routine pattern after immediate safety and medical concerns have been ruled out.
Time · first cue · your response · what happened next
Use the same small step and note what feels easier or harder
Keep · adjust · pause · bring the notes to a clinician